I accidentally deleted some important files from an APFS drive on my Mac and don’t have a Time Machine backup. I’m trying to figure out the safest way to recover deleted APFS files without overwriting anything or making the data loss worse. What tools or steps actually work?
user 1
There’s still a chance, but it really comes down to two things: what you did after deleting the files, and whether this was an SSD, HDD, internal Mac drive, external drive, etc.
The biggest thing is to stop using that drive right now. Don’t save anything to it, don’t install recovery apps on it, don’t run Disk Utility repairs yet. Deleted files often aren’t wiped immediately, but the space they used can get reused. The more you write to the drive, the worse your odds get.
If this was a format in Disk Utility, that doesn’t automatically mean the data is gone either. A quick format usually rebuilds the file system instead of overwriting every bit of old data. If you haven’t put much new stuff on the drive since then, recovery may still be possible.
The annoying exception is SSDs with TRIM. On most modern Macs, the internal SSD uses TRIM, and once those deleted blocks have been cleared, normal recovery tools can’t really do anything with them. External SSDs are a little more hit-or-miss because TRIM depends on the enclosure and connection. Some get TRIM commands, some don’t, so an external SSD can sometimes be more recoverable if you stop using it fast enough.
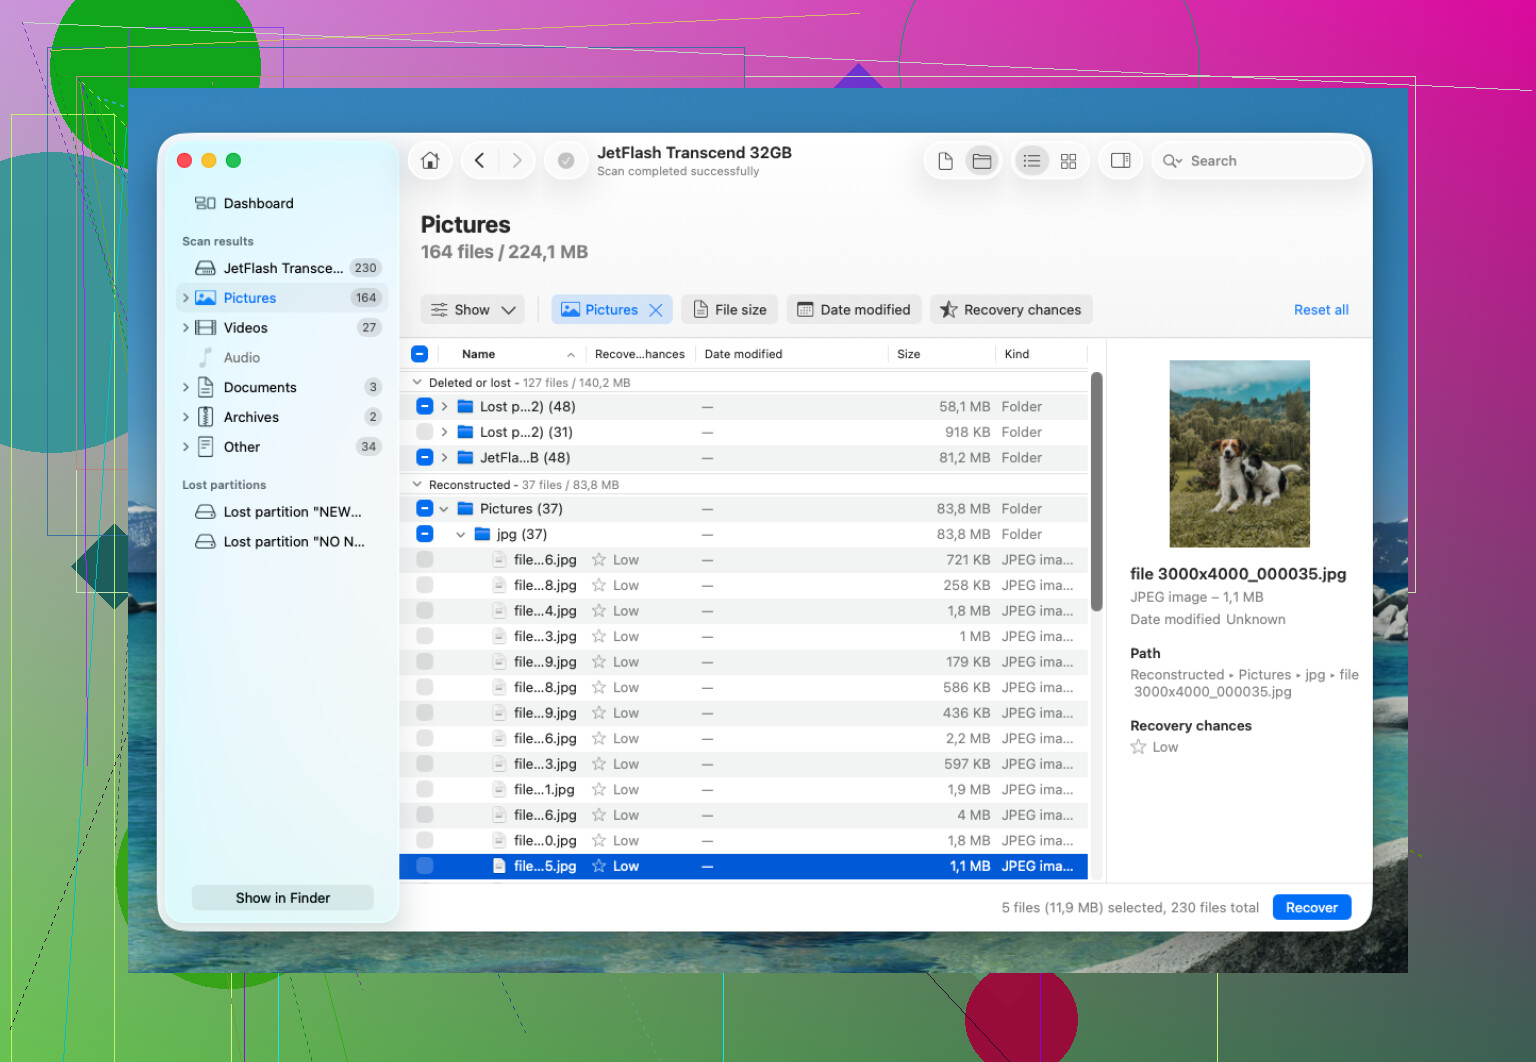
I’ve been in a similar spot with an APFS drive after deleting a folder and emptying the Trash. The thing that helped me most was not panicking and not trying a bunch of random fixes on the same drive. I ended up having the best results with Disk Drill.
What I did was pretty simple:
- Installed Disk Drill on a separate drive.
- Plugged in the APFS drive that had the deleted files.
- Allowed Full Disk Access when macOS asked for it.
- Scanned the whole APFS volume.
- Let the scan finish completely before recovering anything.
- Used preview first, just to make sure the files were actually readable.
- Recovered the files to a different drive, not back onto the problem drive.
One useful thing was that a lot of the recovered folders kept their original names. That’s a lot better than getting one giant pile of files with random names and having to sort it all by hand.
If you don’t have a Time Machine backup, recovery software is probably the next thing to try. Also check for APFS snapshots if this was on a Mac. macOS can sometimes have local snapshots even when your Time Machine drive isn’t plugged in. They’re not always there, but it’s worth checking before you assume the files are gone.
I’d leave Disk Utility First Aid and other repair attempts until after you’ve copied off whatever you can. Recover first, repair later. Doing it the other way around can make things worse.
If the drive is acting physically bad, like not mounting, clicking, disconnecting, freezing during scans, or disappearing randomly, I wouldn’t keep hammering it with software. At that point a proper data recovery lab is the safer route. A lot of them will evaluate the drive for free and only charge if they recover data. It costs more, but if the drive itself is failing, that’s usually the better call.
Don’t recover anything onto the same APFS volume, even if the recovery app offers it as the default. That is the easy way to overwrite the exact space you are trying to save. I agree with @mikeappsreviewer about stopping use, but for an internal Mac SSD I’d be even more strict: shut it down if you can, because macOS keeps writing logs, caches, Spotlight stuff, browser data, etc. If the files matter, boot from another disk or connect the Mac/drive to another Mac and scan from there. If you have enough storage, make an image of the drive first and scan the image instead of repeatedly scanning the original. Disk Drill or similar tools are fine to try, but treat preview as the test: if the file previews correctly, recover it to a different physical drive. If it shows up only as a name with no preview, don’t assume it’s actually recoverable.
Do not let iCloud sync keep running if the missing files were in Desktop, Documents, iCloud Drive, or an app folder that syncs. Before you spend hours scanning the APFS volume, check iCloud.com’s Recently Deleted, the Trash on any other Mac using the same Apple ID, and the app’s own deleted/recent files area if it was something like Pages, Numbers, Photos, Notes, etc. That is the boring recovery path people forget, and it is safer than touching the disk. If the files were only local, then I agree with the general advice above: stop using the drive, scan from another boot disk or another Mac, and recover to separate storage. Disk Drill is fine to try, but I would treat it as a “can it preview my actual files?” tool first, not as proof that everything listed by name is recoverable.