My WD My Passport Ultra suddenly stopped showing up correctly, and I’m worried I could lose years of family photos stored on it. I haven’t done much yet because I don’t want to make things worse. I need advice on safe WD My Passport Ultra data recovery steps, what software or services might help, and whether these photos can still be recovered.
I had this happen with a WD My Passport, and yeah, it sucks fast. Mine looked fine until it didn’t. These drives usually hold up okay from what I’ve seen, even compared with some Seagate units I’ve owned, but when one starts misbehaving, I stop trusting it right away.
The first move is simple. Stop using the drive now. If files were deleted, or the drive started freezing, disconnecting, or throwing errors, every extra write puts your data at more risk. I learned this the hard way years ago and made the mess worse by trying to copy stuff off while it was failing.
Check the drive before you do anything else
Right-click Start, open Disk Management, and look for the Passport there.
If it shows up with the right size, you still have a decent shot at recovering files yourself.
If it does not appear there at all, or you hear clicking, grinding, or repeated spin-up noises, I’d stop and treat it like a hardware problem. At that point, a recovery lab is the safer route.
What worked for me
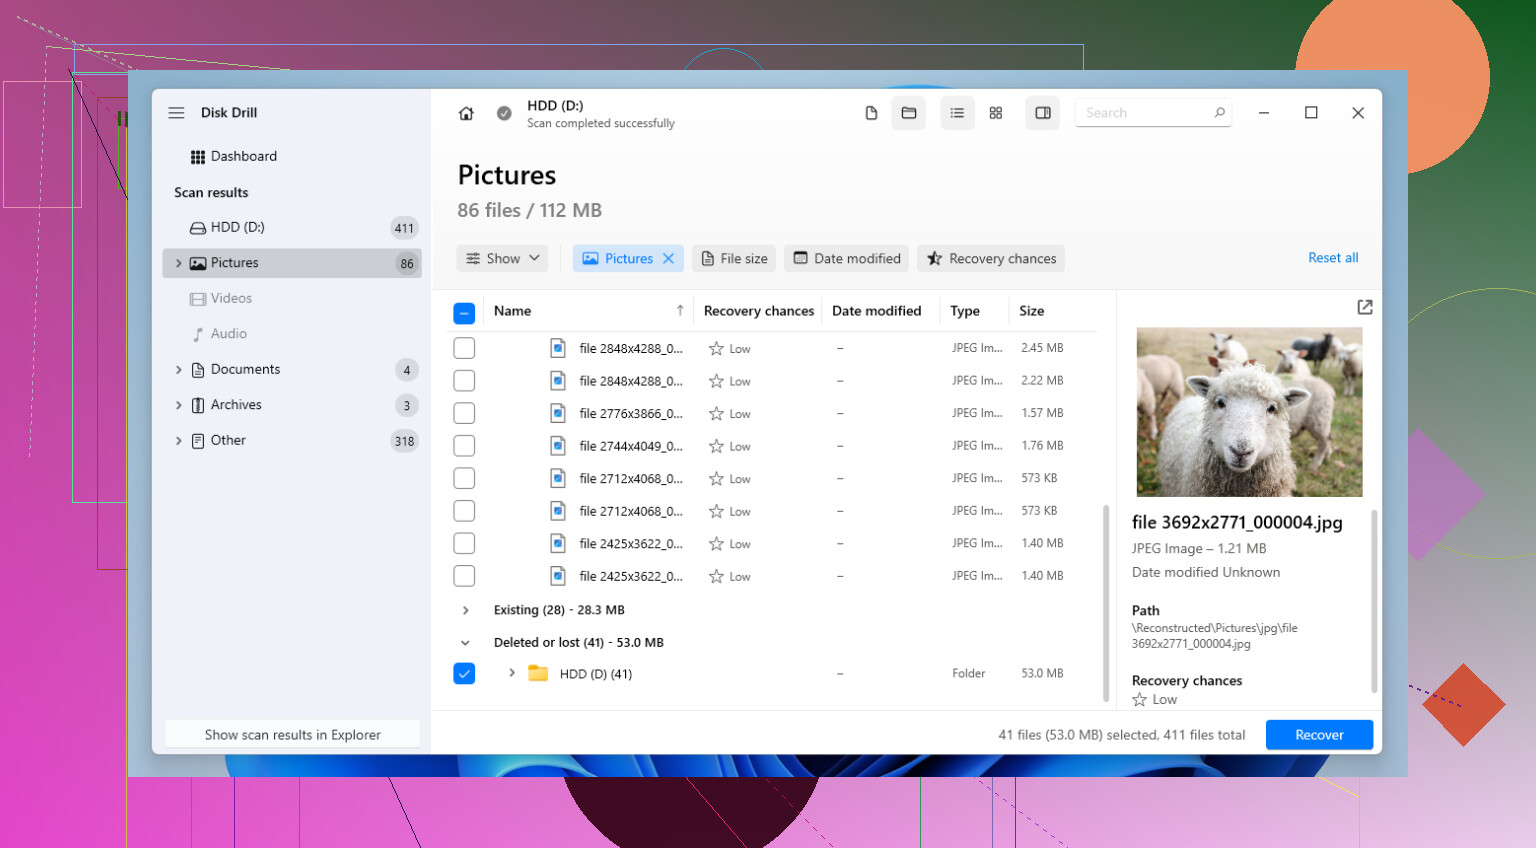
If Windows sees the drive, I’d go with recovery software first. I’ve tried a pile of them over time, and for a WD My Passport I’d reach for Disk Drill. It reads the file systems these drives usually show up with, mainly NTFS, FAT32, and exFAT, so you’re not fighting the tool before you even start.
- Download and install the program on your internal drive, never on the WD drive you’re trying to save.
- Open it, then connect the My Passport.
- Select the drive and start the scan with 'Search for lost data.'
- Pick 'Universal Scan' if you want the broad scan.
- While it scans, look through the results. I usually check 'Deleted or lost' and 'Reconstructed' first.
- The preview function matters a lot. If a photo opens, or a document preview looks normal, your odds are good for recovering an intact copy.
- Choose the files you need and hit 'Recover.'
One small thing people skip. Save recovered files to a different drive. Not back onto the Passport. I know it sounds obvious, but when you’re stressed, you miss stuff.
If you want other options
For a basic delete job, where the drive itself still acts normal, Recuva is fine. It looks old. It feels old too. Still, for 'oops, I deleted the wrong folder,' it has worked for me more than once.
If the issue is a lost partition, or the disk suddenly shows as uninitialized, TestDisk is worth a look if you’re comfortable with low-level tools. It’s free, and in some cases it rebuilds the partition info so the files show up again without a full recovery pass. I would be careful here. The interface is rough, and a wrong choice is not fun to unwind.
The WD My Passport thing people miss
Do not pull the drive out of the enclosure unless you already know the exact board and encryption setup you’re dealing with. A lot of My Passport models use hardware encryption on the USB bridge board. I’ve seen people remove the bare drive, plug it into another adapter, then panic because the data looks blank or RAW. The files are still there, but they look scrambled without the original board handling the translation.
If the USB port on the enclosure is damaged, I’d lean toward board repair or pro help instead of bypassing the case.
Also, if you used WD Security and set a password, you need it. No cute workaround here. The AES-256 hardware encryption on these drives is serious. Recovery software will not pull readable files from a locked unit. You have to unlock it first with the WD tool.
After you recover your stuff
Do yourself a favor and set up a backup somewhere else. I got lazy about this once and paid for it with a weekend of stress. WD points people to Acronis True Image now, which is one option. A second external drive works. Cloud storage works too, stuff like OneDrive or Google Drive. Even copying your important folders to one more place is better than trusting a single Passport and hoping for the best.
Stop plugging it in and out. That is the first thing.
A few people rush into scans. I don’t. If the drive is flaking out, your best move is to make a sector-by-sector image first, then work from the image. Tools like HDD Raw Copy Tool or ddrescue are better for this than jumping straight into file recovery. If read errors are starting, imaging gives you one controlled pass instead of a bunch of random reads.
I agree with @mikeappsreviewer on one big point, don’t remove the bare drive from the My Passport Ultra case. A lot of WD Passport units use USB-board encryption, so a direct SATA hookup often shows gibberish or RAW.
My order would be:
- Try a different USB cable.
- Try a rear USB port on a desktop, not a hub.
- Check Device Manager for USB mass storage errors.
- If it mounts, image it first.
- Run recovery on the image, not the original.
For software, Disk Drill is fine if the drive still reads and you need photo recovery with previews. Photo preview matters a lot. If your JPEGs and HEIC files preview cleanly, your recovery odds are decent. I’d skip write-heavy repair ideas like CHKDSK right now. People love recommending it, but on a weak drive it sometimes makes a bad sitution worse.
If the drive clicks, disappears mid-read, or shows 0 bytes, stop DIY stuff. That is lab territory.
For a solid Western Digital photo recovery walkthrough, this video helps: safe WD My Passport photo recovery steps
If it’s “not showing up correctly,” I’d actually split this into two possibilities before doing anything fancy, because people mix them together all the time:
- the drive is detected, but the file system/partition looks broken
- the drive itself is unstable and can barely stay connected
That distinction matters more than which app you use.
I agree with @mikeappsreviewer and @waldgeist on avoiding CHKDSK and not writing anything back to the WD. Where I’d slightly differ is this: if the drive is dropping offline, freezing Explorer, or taking forever just to identify itself, I would not spend much time trying multiple scans on the original disk. That’s where imaging becomes the safer play. This explains it pretty well: why creating a full drive image first can protect your files during recovery.
A few things you can check that haven’t really been emphasized yet:
-
Look in Device Manager under Disk drives and USB controllers.
- If it appears/disappears repeatedly, that’s a bad sign.
- If it shows the correct model but no accessible volume, recovery is still possible.
-
Check SMART if any tool can read it.
- CrystalDiskInfo sometimes can, sometimes not with USB bridge drives.
- If SMART shows reallocated/pending sectors climbing, stop poking at it too much.
-
Watch for heat and power weirdness.
- Some Passport Ultras get flaky from a bad cable or weak USB power.
- Short test only. Don’t keep reconnecting it 20 times hoping magic happens.
For actual photo recovery, Disk Drill is a reasonable choice because it previews photos well, and for family pics that matters more than a giant raw file list. If JPEG/PNG/HEIC previews look normal, that’s a solid sign. I’d install Disk Drill on the internal drive, then either scan the image if you made one, or the WD only if it seems stable enough.
One more WD-specific thing people forget: if this model had WD Security enabled, make sure it’s unlocked first or the results may look broken/confusing.
If it clicks, shows 0 bytes, or vanishes mid-read, stop DIY stuff. That’s not the moment to “just try one more thing,” even tho everybody does it.
I’m mostly with @waldgeist, @hoshikuzu, and @mikeappsreviewer, but I’d add one thing: before imaging or scanning, test the enclosure behavior for literally one short session only. Some Passport Ultras fail at the USB bridge, not the platters. If the drive powers, shows correct capacity in Disk Management, then drops the volume only, that points more to bridge or file system trouble than immediate head crash.
My rule:
- correct size shown = decent DIY chance
- wrong size, 0 bytes, clicking, or constant reconnects = stop
Small disagreement with the “always scan first” crowd: sometimes a weak bridge makes scans miserable and misleading. A clean image is ideal, but if the bridge is unstable you may not even get that far at home.
About Disk Drill:
- Pros: good photo preview, easy filtering, handles common WD file systems well, decent for family-photo triage
- Cons: not my first pick for severe hardware instability, deep scans can take ages, and recovery quality still depends on how readable the source is
If the drive stays visible long enough, Disk Drill is a sensible way to check whether your JPEG/HEIC files preview correctly. That preview test tells you more than scan progress bars ever will.
One extra WD-specific gotcha: if the volume label suddenly changed or asks to format, do not accept. Windows loves offering the worst possible button at the worst possible time.